Drawings
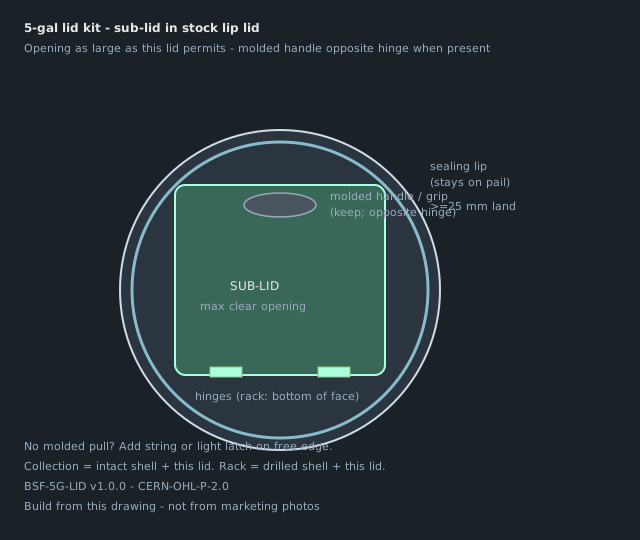
Build from these drawings—not from marketing photos. Scroll the set; each figure is the measuring source.
Materials
Gather these before you cut. Optional items use unit optional or qty 0 for notes.
| Qty | Unit | Item | Spec | Notes |
|---|---|---|---|---|
| 1 | each | Stock lip lid | Original circular lid matched to 5-gal (19 L) food pail | Gamma / snap lids OK if same cut rules; practice on a spare; keep molded handles when present |
| 1 | each | Sub-lid panel | Cut from same stock lid — largest opening lid permits | ≥25 mm land to sealing lip; molded handle opposite hinge when present |
| 2 | each | Strap hinges | 40–50 mm (1½–2 in) with screws | Hinge on rack bottom-of-face edge so panel hangs open when tilted |
| 1 | optional | String pull | Cord loop through free edge | Only if no useful molded grip; kitchen lift + rare wind tie |
| 1 | optional | Light latch | Toggle / barrel bolt / small catch | Not a padlock; stop wind/chickens only |
| 1 | optional | Silicone | Food-contact rated bead under panel land | Odor control on kitchen lids; do not glue panel shut |
| 1 | set | Tools | Knife or multi-tool; drill; deburr; marker; square | Eye protection |
Optional spreadsheet download: materials.csv
Design: BSF-5G-LID
Version: 1.0.0
License: CERN-OHL-P-2.0
Adapt the stock circular lip lid that ships with a US 5-gallon (19 L) food pail. Most bakery lids seal hard with a full-circumference lip—operators fight the whole lid every feed. This kit cuts a sub-lid (hatch) into that lid, hinges it, and adds an optional string or small latch handle.
Same lid works on:
| Role | Bucket body | Lid kit |
|---|---|---|
| Collection (kitchen / route) | Intact shell—no drain or harvest holes | This lid |
| Rack / process | 5-gallon-rack drilled shell |
This lid |
Standalone house units and modular / municipal banks all use this lid language. Do not cut a hatch into the curved barrel wall.
Vessel overview: 5-gallon. Hub frames: modular-unit.
Concept
  Top view of stock lid (circle):

      .-------------------.
     /   _____________     \   ← molded handle / grip (if any) opposite hinge
    |   |  SUB-LID    |     |   ← opening: as large as this lid permits
    |   |  (hinged)   |     |   ← hinge on edge nearest ground when tilted
    |   |_____________|     |   ← optional string / small latch on free edge
     \                     /
      '-------------------'
lip stays on pail- Keep the outer lip locked on the pail rim—you stop fighting the full seal every day.
- Cut the largest sub-lid the lid allows—bounded by the sealing-lip land (≥25 mm), ribs you must keep for strength, and any molded features you keep. Do not default to a small centered hatch.
- Molded handles, grips, pour spouts, or raised logos already in the stock lid are fine—accommodate them. Usual layout: keep the molded handle on the free edge (opposite the hinge) so it becomes the pull; cut around or through soft plastic so the panel still swings.
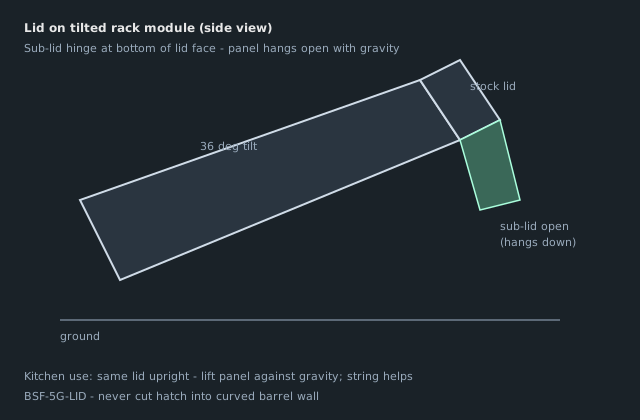
- Hinge so the sub-lid opens outward and down when the bucket is tilted (rack) or opens up when the bucket is upright (kitchen)—mount hinge on the edge that should hang open with gravity in the rack orientation (bottom of the lid face when the pail is on its side).
- Optional string pull or light latch (toggle / hasp-light) on the free edge if there is no useful molded grip—not a padlock; keep dump cycles fast.
Dimensions (typical)
| Parameter | Rule | Notes |
|---|---|---|
| Sub-lid opening | As large as the lid permits | Maximize clear opening; leave continuous land to lip / kept ribs |
| Clearance to lip | ≥25 mm land | Do not undercut the sealing lip |
| Molded features | Keep; place opposite hinge | Handle / grip / spout on free edge when possible |
| Hinge | 2× 40–50 mm strap hinges | Stainless or plated; food-area screws |
| Added handle | String loop or light latch | Only if no useful molded pull remains |
Mark the panel with the lid on the empty pail. Trace around molded parts you keep; size the cut to the maximum clear rectangle (or rounded rectangle) that still leaves the land.
Tools
Utility knife or oscillating multi-tool, fine saw, drill, deburr file, marker, square, screwdriver. Optional: heat gun to ease lip lids during first test-fit (do not melt the panel).
Build sequence
1. Source the lid
- Prefer the original lid matched to your pail SKU (Gamma Seal and snap-lids vary—test fit).
- Wash; reject cracked lids.
- Practice on a spare lid if lids are cheap locally.
2. Mark the sub-lid
- Seat the lid on an empty pail.
- Inventory molded features (handle, grip recesses, spout, logos). Decide what stays on the panel vs the fixed land.
- Mark hinge edge = bottom of the lid face in rack orientation (nearest the ground when the pail is on its side at 36°). Put any kept molded handle opposite that hinge (on the free / lift edge).
- Draw the largest rectangle (or rounded rectangle) the face allows: continuous land ≥25 mm from the sealing lip, and from any stiffening ribs you must keep for strength. Prefer max scoop/hand clearance over a small centered hatch.
3. Cut the panel
- Drill a starter hole at a corner inside the waste piece.
- Cut on the waste side of the line; keep edges square.
- Deburr inside and out—sharp HDPE cuts hands and gloves.
- Dry-fit: panel should clear the opening with a small gap (~1–2 mm) so humidity does not bind it.
4. Hinge
- Mount two strap hinges on the marked edge, screws into the fixed lid land and the panel.
- Check swing: on a tilted rack module the panel should hang open by gravity when released.
- On an upright kitchen collection pail the same hinge still works—operators lift the panel against gravity; string helps.
5. Optional string or latch
- Prefer a stock molded handle on the free edge when the lid already has one.
- String: drill a small hole in the free edge; knot a short loop as pull-handle (if no molded grip).
- Latch: light toggle or barrel bolt on the free edge—enough to stop wind or chickens from lifting; not a security hasp.
- Skip add-ons if gravity + friction (or the molded handle alone) is enough in your climate.
6. Seal check (optional)
A thin silicone bead under the panel land reduces odor escape on kitchen lids. Do not glue the panel shut. Wipe food-contact surfaces after cure.
7. Label roles (ops tip)
Mark lids C (collection) vs R (rack) with paint pen if both live in the same wash bay—same kit, different buckets underneath.
Safety
- Eye protection when cutting.
- No solvents that attack HDPE.
- Food-grade vessels only under the lid.
Tuning
| Symptom | Try |
|---|---|
| Panel binds when humid | Enlarge gap 1 mm; wax edge lightly |
| Panel lifts in wind (rack) | Light latch or string tie to cradle |
| Opening too small for scoop | Enlarge to max land allows; keep lip land + opposite-hinge handle |
| Kitchen smell | Silicone land bead; empty collection daily |
Related
5-gallon-rack— shell holes for process modules
5-gallon— standalone / capacity
modular-unit— cradles that hold rack buckets
/articles/tank-design/— access rules