Drawings
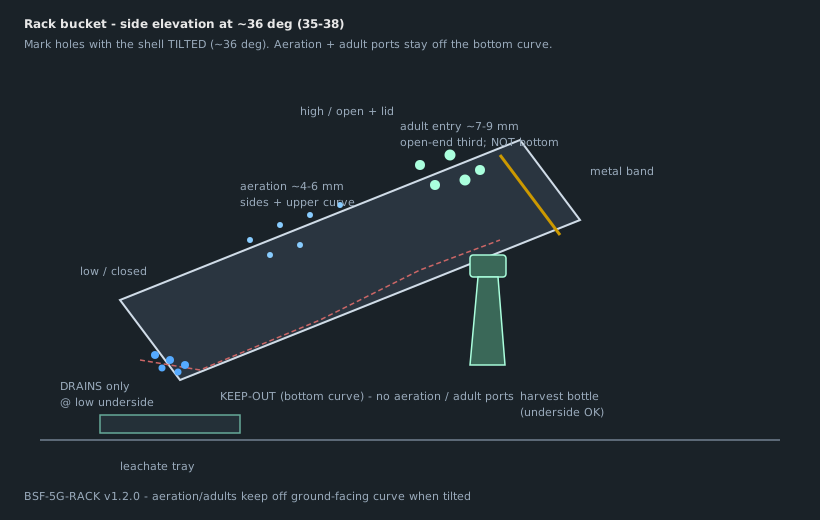
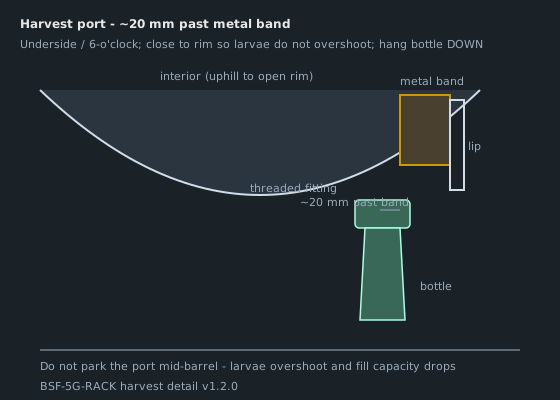
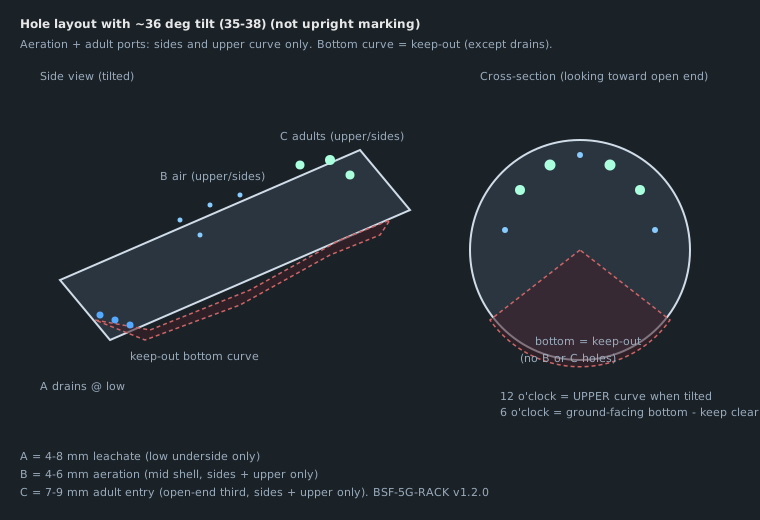
Build from these drawings—not from marketing photos. Scroll the set; each figure is the measuring source.
Materials
Gather these before you cut. Optional items use unit optional or qty 0 for notes.
| Qty | Unit | Item | Spec | Notes |
|---|---|---|---|---|
| 1 | each | Vessel | 5 gal (19 L) food-grade HDPE bakery/restaurant pail; clean | Process/rack only—do not drill collection pails |
| 1 | each | Threaded harvest fitting | Bulkhead or 3/4 in PVC male adapter through underside ~20 mm past metal band; washers + nut | ~20 mm past metal band; PET 28-400 preferred |
| 1 | each | Collection bottle | 1–2 L PET (or jar) with matching thread; hangs DOWN | Bottom cut off for emptying if needed |
| 1 | lot | Drain cluster | Many ~4–8 mm on low-end underside (closed-bottom corner) | Leachate only; no interior mesh; deburr |
| 1 | lot | Aeration holes | Sparse ~4–6 mm on sides + upper curve when tilted (mid shell) | Keep off ground-facing bottom curve—nothing should drain/fall out |
| 1 | lot | Adult entry ports | ~7–9 mm (under 10 mm) in open-end / top third on sides + upper curve | Adults fly in to oviposit; never on bottom curve when at 36° |
| 1 | tube | Sealant | Silicone (food-contact rated if available) | Harvest fitting only |
| 1 | each | Lid kit | BSF-5G-LID completed stock lip lid with sub-lid | See /designs/5-gallon-lid/ |
| 1 | set | Tools | Drill; hole saw/step bit; 4–9 mm bits; deburr; wrenches; inclinometer | Clamp pail when cutting harvest hole |
Optional spreadsheet download: materials.csv
Design: BSF-5G-RACK
Version: 1.0.0
License: CERN-OHL-P-2.0
Adapt a 5-gallon (19 L) food-grade pail into a process / rack module: a drain cluster at the low-end underside, aeration on sides and upper curve, adult-entry ports in the open-end third (also off the bottom), and a large harvest hole near the open rim with a threaded bottle connector—~20 mm past the metal band under the lip.
Together with the 5-gallon-lid kit, this is what turns stock bakery pails into vessels that sit in modular cradles and municipal banks. Do not drill collection / kitchen pails—those stay intact under the same lid kit.
Standalone house stand + capacity: 5-gallon.
Concept
  Rack orientation (pail on side, 36 deg):

        high end (OPEN + lid kit)          low end (closed bottom)
                    \                              /
                     \      36 deg                 /
                      \  substrate ~~~~~~~~~~     /
                       \_________________________/
                        |                       |
              harvest   |  threaded bottle      |  small drilled drains
              near rim  V  hangs DOWN           V  cluster @ low corner
                        |                       |
                   metal band under lip    leachate tray / PVC sump
(keep hole clear of band)- Harvest port: large hole through the ground-facing underside near the open rim, below the head ring / metal reinforcing band. Threaded connector; bottle hangs down. Prepupae crawl up the incline into the bottle.
- Drains: many small holes (~4–8 mm) clustered at the geometric low corner (closed-bottom underside when tilted)—leachate only; no interior mesh.
- Aeration: ~4–6 mm on the sides and upper curve when tilted (mid-shell)—not on the bottom curve.
- Adult entry: ~7–9 mm (under 1 cm) in the open-end / top third on sides and upper curve only—adults fly in to lay eggs; keep off the bottom arc.
- Lid:
BSF-5G-LID—not a barrel-wall hatch.
Dimensions (typical US 5-gal)
| Parameter | Planning default | Notes |
|---|---|---|
| Harvest hole | ~28–32 mm ID (fits common bulkhead / PET adapter) | Center ~20 mm past metal band on underside |
| Offset past metal band | ~20 mm past band edge | Close to rim so larvae do not overshoot; do not drill the band |
| Drain cluster | Many × 4–8 mm | Dense at low-point underside (leachate) |
| Aeration | ~4–6 mm | Sides + upper curve only (tilted) |
| Adult entry | ~7–9 mm (under 10 mm) | Open-end third; sides + upper only |
| Tilt in cradle | 36° ± 2° (35–38° band) | Frame sets angle; this kit is the shell |
Mark holes with the pail dry and empty. For harvest, mark at 6-o’clock relative to the future high end (open lid end).
Threaded bottle connector
Prefer a mechanical thread, not epoxy-only:
| Option | Notes |
|---|---|
| A — Bulkhead + PET | Food-grade bulkhead or tank fitting through the harvest hole; mate to a 28-400 (or local) PET bottle / coupler |
| B — PVC male adapter | ¾ in PVC male thread through the hole with inside/outside washers + nut; bottle neck or coupler screws on |
| C — Field hack | Cut PET neck + PVC coupler + silicone (legacy)—use only if A/B unavailable; reseal when it weeps |
Bottle hangs nose-down. Cut the bottle bottom off for emptying, or use a second screw-on jar if your thread allows.
Tools
Drill, hole saw or step bit for harvest, 4–9 mm bits for drains/aeration/adult ports, deburr file, marker, square, wrenches for bulkhead nuts, silicone (food-contact if available).
Build sequence
1. Inspect the vessel
- Food-grade HDPE bakery/restaurant pail only.
- Reject solvent / pesticide history.
- Wash and dry. Keep collection pails undrilled in a separate pile.
2. Mark high / low ends
- Decide which circular end is head (open + lid).
- With the pail upright, the rim + metal band are at the top.
- For rack use the pail lies on its side: head = high end. Mark a longitudinal “underside” stripe (6-o’clock when mounted).
3. Harvest hole (near rim)
- On the underside stripe, measure ~20 mm past the metal band (toward the closed bottom)—not mid-barrel.
- Confirm the mark is ~20 mm past the metal band (do not drill the band itself).
- Cut the large harvest hole (~28–32 mm or per your fitting).
- Deburr inside and out—burrs cut larvae and gloves.
- Dry-fit the threaded connector; tighten with washers; silicone the joint if the fitting calls for it.
- Screw on a test bottle; fill with water; confirm hang-down clearance in a mock cradle.
4. Drain cluster (low corner)
- Identify the closed bottom end—this is low when tilted.
- Cluster many 4–8 mm holes on the underside near the geometric low point.
- Deburr every drain hole. Never install interior mesh.
5. Aeration and adult entry (tilted keep-out)
- Set the empty pail at ~36° (or mark the future underside stripe). That ground-facing bottom curve is keep-out for aeration and adult ports—only the leachate drain cluster belongs there.
- Drill a sparse set of ~4–6 mm aeration holes on the sides and upper curve of the mid-shell—separate from the drain cluster—so air moves through the headspace without weeping solids out the bottom.
- In the open-end / top third, drill larger adult-entry ports ~7–9 mm (less than 1 cm) on the sides and upper curve only. Adults fly in to oviposit; nothing should fall out the bottom arc.
- Deburr every hole inside and out.
6. Lid kit
Fit a completed 5-gallon-lid on the open end. Confirm sub-lid hinge hangs open when the module is at 36°.
7. Water test
- Cap harvest with bottle; plug or elevate drains over a tray.
- Add water; check harvest fitting for weeps.
- Tip to 36° over a leachate tray; confirm drains empty to the tray / future PVC—not under the bottle.
8. Install in cradle
Seat in modular cradle or standalone stand per modular-unit / 5-gallon. Connect drain jumpers if the bank uses PVC → sump.
Safety
- Eye protection; clamp the pail when hole-sawing.
- No point loads on HDPE in the cradle—wide rubber-lined contact.
- Shade outdoors; dark plastic overheats beds.
Tuning
| Symptom | Try |
|---|---|
| Larvae stop short of port | Lower port 10–15 mm; verify 36° |
| Bottle rubs metal band | Move hole toward closed end; check band clearance |
| Fitting weeps | Reseat washers; silicone; replace cracked HDPE |
| Anaerobic smell / wet floor | Clear drain cluster; empty tray; less feed |
Related
5-gallon-lid— sub-lid access
5-gallon— capacity / standalone
modular-unit— BANK-5G-8 cradles
municipal— many banks + logistics
/articles/tank-design/— drains, harvest, shade