Drawings
Build from these drawings—not from marketing photos. Scroll the set; each figure is the measuring source.
Materials
Gather these before you cut. Optional items use unit optional or qty 0 for notes.
| Qty | Unit | Item | Spec | Notes |
|---|---|---|---|---|
| 1 | each | Vessel | 5 gal (19 L) food-grade plastic bucket OR steel pail; clean; no prior toxic contents | Used bakery buckets OK if washed; avoid unknown chemical pails |
| 1 | each | Lid kit | BSF-5G-LID completed stock lip lid with max sub-lid | See /designs/5-gallon-lid/ — do not cut hatch into barrel wall |
| 0 | note | (in lid kit) | Hinges ship with lid kit | Do not double-count |
| 1 | optional | String | Cord or twine for pull-handle / rare wind tie-down | Usually part of lid kit; optional extra |
| 1 | lot | Stand (pick one) | Cinder blocks / CMUs wedged to ~36° OR 25 mm steel tube OR 2×4 lumber frame | Blocks = fastest patio hack; pad contact edges; clear high end for bottle + hanging lid |
| 2 | optional | Cradle straps | 50 mm metal band or rope/string to blocks or U-bolts + rubber | Wide contact for plastic; string-tie OK on block nests |
| 1 | optional | Pad | Slit garden hose / rubber / cardboard on block edges | Stops point-load cracks on HDPE |
| 2 | optional | Flat-bar cradle rings (welded stand) | Upper+lower formed flat bar + push-on EPDM edge trim | Preferred over mesh basket; see modular open-cradle section |
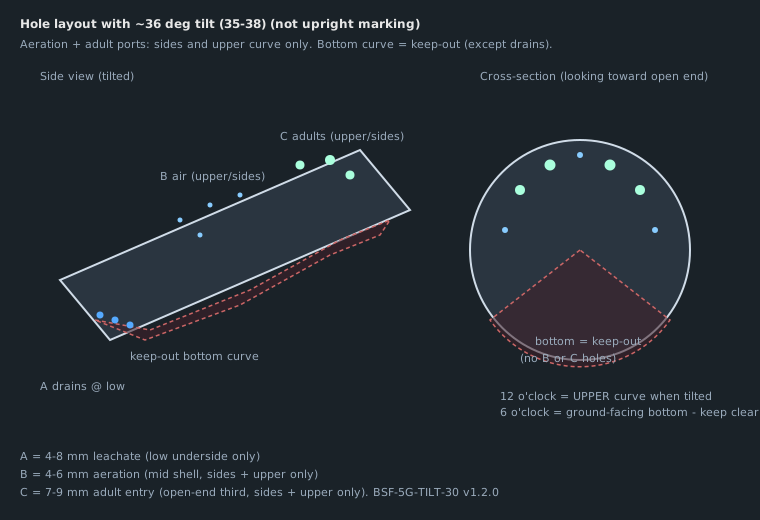
| 1 | lot | Drain cluster | Many ~4–8 mm at geometric low point (process modules) | See rack-bucket kit; no interior mesh |
| 1 | lot | Aeration holes | Sparse ~4–6 mm on sides + upper curve when tilted (mid shell) (process) | Keep off ground-facing bottom curve—nothing should drain/fall out |
| 1 | lot | Adult entry ports | ~7–9 mm (under 10 mm) in open-end / top third on sides + upper curve (process) | Adults fly in to oviposit; never on bottom curve when at 36° |
| 1 | each | Leachate catch tray | Shallow tote / roasting pan / oil drip pan under low-end drain cluster | Required companion—not frass tea; empty/rinse on schedule; optional cloth over pan only (never inside bucket) |
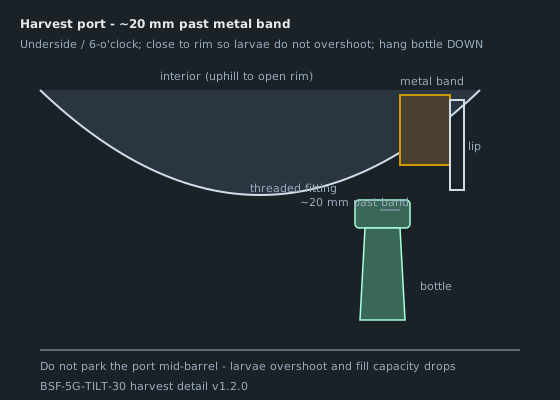
| 1 | each | Harvest adapter | 28-400 PET bottle thread through UNDERSIDE ~20 mm past metal band | ~20 mm past metal band; PET 28-400 preferred |
| 1 | each | Collection bottle | 1–2 L PET bottle; bottom cut off; hangs DOWN under high end | Replace when dirty |
| 1 | roll | Sealant | Silicone (food-contact rated if available) | Harvest port only—not for drain mesh |
| 12 | each | Fasteners | M6×25 mm bolts + nylock nuts + washers | Frame and cradle |
| 1 | set | Tools | Drill; 4–9 mm bits; deburr tool; level; inclinometer | File metal burrs before use |
Optional spreadsheet download: materials.csv
Design: BSF-5G-TILT-30
Version: 1.3.0
License: CERN-OHL-P-2.0
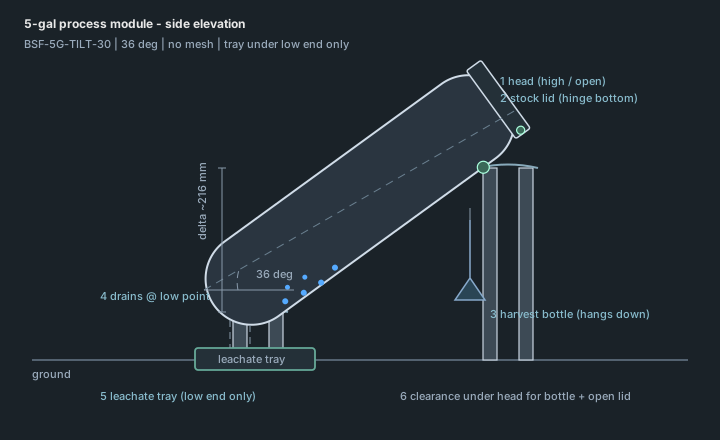
Upcycle a 5-gallon (19 L) bucket or pail into a self-harvesting larval unit. The vessel lies on its side, raised on legs, tilted 36° from horizontal. The inner floor/wall acts as the harvest ramp (within the 28°–45° range cited in field literature). Prepupae crawl up the incline and drop into a hanging collection bottle under the high end; leachate leaves through drilled holes clustered at the low point—no drain mesh.
Cross-cutting rules: /articles/tank-design/. Hub scale: modular unit (per-bucket math).
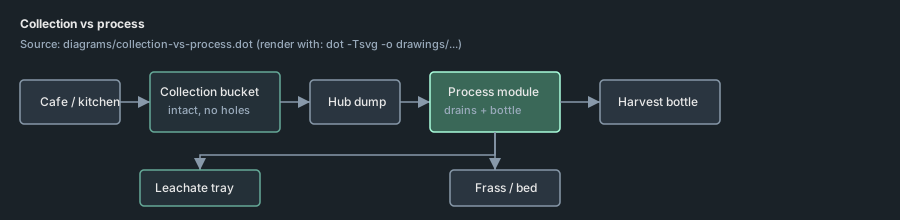
Two bucket roles
| Role | Adaptation | Use |
|---|---|---|
| Collection bucket | Intact shell + lid kit |
Route / kitchen pickup; dump at hub; wash; reuse |
| Rack / process module | rack bucket shell + lid kit |
Standalone stand or modular rack cradle |
Same stock 5-gal SKU—do not drill route pails. The two kits above are what make bakery buckets work in modular and municipal settings. Cinder-block standalone = rack bucket + block stand (not a third vessel type).
Leachate tray
Drains empty into a catch tray/pan under the low end (standalone) or into PVC → shared sump (modular)—never onto the floor. Leave clearance under the high end for the hanging bottle and hanging-open lid. Empty/rinse on a schedule; liquid is leachate, not frass tea.
Standalone tray (BOM sketch)
| Qty | Item | Notes |
|---|---|---|
| 1 | Shallow tote, roasting pan, or oil drip pan | Width under drain cluster; height clears ground when pail is at 36° |
| — | Optional screen/cloth over tray only | Keeps debris out of pan—not inside the bucket |
Exact tray SKU is local hardware; mark clearance on the side-elevation drawing when redrawing trays.
Capacity planning
Public summary: /designs/5-gallon/#capacity-planning.
Constants (planning defaults)
| Symbol | Value | Meaning |
|---|---|---|
V_nom |
19 L | Nominal 5-gal shell |
V_act |
~10 L | Active wet bed in tilted low-end pool (~50% steady fill) |
F_lo |
0.5 kg/day | Wet feed — conservative (learning / dilute coffee blend) |
F_mid |
0.8 kg/day | Wet feed — mid (mixed trim, hub planning default) |
F_hi |
1.2 kg/day | Wet feed — aggressive (dense, well-managed) |
Rack module (vertical tier in modular stack): same F_* band; V_act ~8.5 L per module. See modular unit capacity.
Substrate volume ≠ daily throughput. Larvae limit kg/day.
By feed profile (one tilted drum)
| Feed profile | Typical wet kg/day | Notes |
|---|---|---|
| Tier-A coffee (per module) | 0.5–0.8 | Feed rate into one bucket with SCG blend—not café output. Cafés often generate ~8–10 kg wet SCG/day (claim); blend ingredient (economy) |
| Mixed kitchen trim | 0.8–1.2 | F_mid–F_hi; ~one household sorted stream (~0.5 kg/day mid from UNEP-based planning) |
| Animal tailings (chicken, pig) | 1–2+ | Common on mature farm-compound drums—often above coffee-route defaults (waste stream) |
Ramp feed to observed consumption. Hub sizing uses the conservative per-module band unless you have field logs. Source generation ≠ module capacity—size module counts from café/restaurant/household generation claims on the research hub and municipal rollout.
Concept
        [ LID KIT — sub-lid in stock lip lid ]
              |  hangs open on tilt; string/latch optional
    ----------+----------  high end (open / lid)
   /                       \
  |   substrate ~~~~~        |  36° tilt — crawl uphill
   \                       /
        | harvest bottle     hangs UNDER high end (6-o'clock)
        V pointing down
         o o o drilled drains  clustered at low point → catch pan
======================== legs / cradle / cinder-block wedge- Head (high end): build the
lid kit—cut a hinged sub-lid into the stock lip lid (same part for kitchen collection and rack modules). Do not cut a feed hatch into the curved sidewall.
- Process shell: follow
rack bucketfor harvest + drains when this unit is a process module (collection pails stay undrilled).
- Harvest port: on the underside of the shell (ground-facing / 6-o’clock), ~20 mm (~¾ in) past the metal band (toward the closed end). Bottle hangs down; prepupae crawl up the incline and drop into it.
- Drain / aeration / adults: dense 4–8 mm drain cluster at the geometric low point; separate ~4–6 mm aeration holes around the shell; ~7–9 mm adult entry ports (under 1 cm) in the open-end / top third, all around—no interior mesh.
- No separate PVC ramp — drum tilt supplies climb angle.
Dimensions (typical US 5-gal bucket)
| Parameter | Value |
|---|---|
| Axis length (bucket on side) | ~368 mm (14.5 in) |
| Leg height difference (36° tilt) | ~216 mm (8.5 in) |
| Harvest hole center from head ring | ~20 mm past metal band |
| Drain cluster | Dense near lowest point on low-end underside |
Tune harvest height after first cycle if larvae stop short of the port.
Tools
Drill, assortment of bits (~4–9 mm), deburr file, silicone gun (harvest fitting only), welder or lumber screws, inclinometer, marker, square. Lid kit: knife/jigsaw, strap hinges, optional string/latch (see 5-gallon-lid).
Build sequence
1. Inspect the vessel
- Food-grade plastic or clean steel pail only.
- Reject containers that held solvents, pesticides, or unknown chemicals.
- Wash and dry.
2. Build the stand
Target: high support at the lid/open end, low support at the closed bottom. Height difference between cradle centers ≈ axis × sin(36°) ≈ 216 mm for a standard US 5-gal. Leave clearance under the high/lid end for the hanging harvest bottle and for the lid to swing open downward. Confirm 36° ± 2° (band 35–38°) with an inclinometer (phone app is fine). Soften any hard edge that bears on plastic (hose scrap, rubber, folded cardboard)—point loads crack pails.
Option A — Cinder-block wedge (fastest hack)
Wedge the bucket between concrete blocks / CMUs (local “bloques”) so the shell sits at ~36°. No welding, no lumber cut list.
- Common 8×8×16 in (≈200×200×400 mm) blocks work: e.g. one course under the low/tail and two courses (or one course + a half/turned block) under the high/head, then nudge spacing until the inclinometer reads ~36°. Exact stack depends on block size—tune by angle, not by a fixed BOM.
- Seat the shell in the hollows or on padded flat faces so contact is wide. Optional scrap wood or rubber “saddle” on the block so the pail does not rock on a sharp edge.
- Keep a gap under the high end for the hanging bottle and hanging-open lid. Slide the leachate catch under the low end between blocks.
- On soft ground, put blocks on a scrap plank or packed gravel so they do not sink unevenly and kill the angle.
- Strap or string the pail to the blocks if kids, dogs, or wind can knock it—friction alone is a learning-unit compromise, not a permanent outdoor guarantee.
Best as a low-cost first standalone stand before paying a welder. Same drilled bucket becomes a rack module later; only the stand changes.
Option B — Lumber or welded frame
- See
drawings/side-elevation.svg.
- High pair of legs at the head; low pair at the tail.
Welded frame (preferred cradle): 25–50 mm square tube legs with upper + lower formed flat-bar rings and push-on EPDM edge trim on the contact edges (same recipe as the modular open cradle). Add a head stop so the pail cannot slide downhill. Skip expanded-mesh baskets and peel-prone adhesive neoprene for outdoor damp use.
Lumber frame: 2×4, lag screws, same geometry; pad contact with hose scrap or EPDM if available. Prefer this (or blocks that are tied down) when the unit lives in a busy yard long-term.
3. Drainage and aeration (process modules only)
Collection / kitchen pails: skip this step—leave the shell intact.
Process / rack modules: follow 5-gallon-rack § drains, aeration, and adult entry. Summary: dense 4–8 mm low-corner drains; side/upper aeration (off bottom curve when tilted); ~7–9 mm adult ports in the open-end third; no interior mesh; optional barb for PVC. Slide leachate catch under the cluster. See /articles/leachate/.
4. Head access (lid kit)
Build BSF-5G-LID: cut a sub-lid into the stock lip lid, hinge so it hangs open on a 36° rack, optional string or latch. Same lid on collection and process shells. Do not cut a hatch into the curved barrel wall.
5. Harvest bottle port (process modules only)
Collection pails: skip.
Process / rack modules: follow 5-gallon-rack § harvest—near-rim underside hole ~20 mm past the metal band, threaded bottle connector, bottle hangs down under the high end. Leave cradle clearance for bottle + open sub-lid.
6. Mount and leak test
- Seat bucket in cradle or block nest; strap or string snug, not crushing.
- Pour 4 L water; check drains and harvest fitting for weeping.
- Fix before adding feed. Confirm the lid swings open and hangs clear of the stand/blocks.
- Re-check tilt after the first wet load (blocks can settle).
7. Startup
- Shade under roof or tarp (
/articles/tank-design/— shelter section).
- Start with 1–2 kg wet feed and torn plain cardboard; a few active larvae are optional (attractant smells only)—see
/guides/setup/#seed-a-new-bucket.
- First self-harvest often 2–4 weeks (extension guides).
- If migration is weak, verify moisture (~70–80% wet basis) and tilt (stay in 35–38°).
Plastic vs metal
| Plastic bucket | Steel pail | |
|---|---|---|
| Drilling | Easy; deburr | File all burrs; optional weld-on bosses |
| Heat | Keep out of direct sun | Can overheat in sun — shade mandatory |
| Cradle | Flat-bar rings + EPDM trim (see modular) | Can weld saddles; pad blocks |
| Rust | N/A | Paint exterior if outdoors |
Maintenance
- Clear clogged drain holes with a stick or re-drill nearby if needed (no mesh to rinse).
- Replace collection bottle if fermented or cracked.
- Stir surface crust through the open lid weekly.
- Re-check tilt after bumps, rain washouts, or block settling.
Files
| File | Purpose |
|---|---|
bom/materials.csv |
Bill of materials |
drawings/side-elevation.svg |
Side view, leg heights, underside bottle |
drawings/harvest-port.svg |
Underside bottle thread detail |
drawings/drain-pattern.svg |
Low-point drill cluster |
geometry/stand.scad |
Parametric leg height calculator |
References
Tank design article and linked DIY guides: /articles/tank-design/.